
Abstract — Smart contracts are being introduced to IOTA, which has proposed an interesting take on distributed ledgers by proposing the Tangle. The Tangle promises to provide a more scalable transaction infrastructure with lower fees, potentially overcoming limitations of Ethereum and other blochain-based ledgers. Due to the current alpha state of IOTA smart contracts, the official documentation lags and it is a bit of challenge to get a working setup. To help interested developers and the IOTA community to more quickly try out smart contracts, this article describes how to set up a private IOTA network with the latest state of the software and demonstrates a workable prediction market smart contract developed in Rust.
Introduction
Smart contracts are codified contracts using rules and algorithms that can automatically trigger and incur electronic transactions of cryptocurrencies like Ether. The expected economic impact of smart contracts is very large as they allow for improving the efficiency of many existing business models and they also allow for completely new business models. For instance payouts of insurance contracts can be automated using smart contracts or autonomous cars could also pay tolls and parking fees automatically.
While smart contracts are already well known amendments from blockchain approaches like Ethereum, these approaches suffer from shortcomings like low throughput, and high transaction costs. For these reasons, the IOTA foundation had set out to first propose a new and more scalable transaction system based on the so called “Tangle”. Secondly, IOTA version 2.0 is currently under development, and it includes an approach to smart contracts. Smart contracts under IOTA 2.0 are promised to be built on an infrastructure that both scales well, and incurs low transaction costs.
Before the background of a promising new approach for smart contracts, I started to explore how to set up a private IOTA network for development and how to develop and deploy a smart contract on it. As the IOTA developer documentation is lagging it was quite a challenge to get a working solution. Thus, the main contributions of this article are, (1) a proper description how to set up the network and how to enable smart contracts, and (2) a fully working demonstration smart contract, which implements a simple prediction market in which multiple network participants can predict and bet on a certain outcome of an event.
The outline of this article is, I give (1) an overview of IOTA and the network’s smart contract integration, (2) a description of how to set up an environment for developing and testing IOTA smart contracts, (3) an implementation of a simple prediction market as a smart contract, (4) some notes and insights on IOTA and smart contracts, and (5) a conclusion.
The IOTA Network and Smart Contracts
IOTA is about a new kind of public and permissionless distributed ledger for exchanging value and data. The IOTA network has been designed to overcome the main bottlenecks of Blockchain-based distributed ledgers. Due to the organization of transactions (of value) in a chain, there is just one end to append new ones, which makes it slow. Thus, in contrast to the Blockchain-based approaches the distributed ledger of IOTA is organized in a different way. The Blockchain, which is central to Bitcoin or Ethereum for instance, is replaced by the Tangle. The Tangle connects transactions via edges in a directed (and acyclical) graph (see next figure). In contrast to the Blockchain, there are multiple nodes (representing transactions) on which new edges to new nodes, i.e., transactions, can be appended.

Beside the data structure, there are further key differences to classic Blockchain-based approaches. The consent mechanism requires no miners because all users help in validating transactions. Therefore, transactions can be essentially conducted with zero fees. The current IOTA network still requires a central coordinator, defining trusted transaction milestones, which other transactions need to reference to be also trusted. To achieve true decentralization, the planned update to IOTA 2.0 should overcome this limitation.
The key properties and key promises of IOTA are of being
- highly scalable by a new data structure allowing for parallel transactions
- requiring few resources and being suitable for devices and sensors
- having zero-fee transactions
- running fast transactions
- finally approving messages within seconds
- providing a distributed network, which is robust against attacks
These properties would enable a layer of trust and a very scalable and efficient messaging system for the “machine economy” with a very large amount of devices connected to the Internet. The current version of IOTA on the Mainnet is 1.5, which went live in April 2021. Version 1.5 is seen as an intermediate step in maturing the IOTA technology and proving its usability and practical value. This would form the basis for smart contracts that use the messaging capabilities of the IOTA network. Smart contracts are supposed to be introduced in version 2.0 the latest and might be even backported to 1.5. At the time of writing, smart contracts are subject to development.
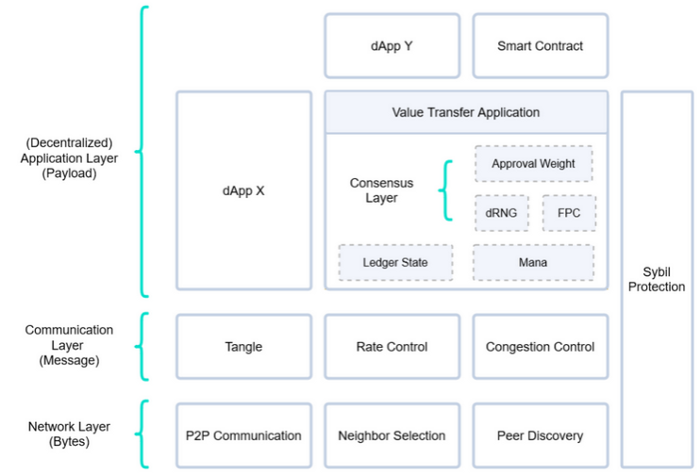
The design for IOTA 2.0 foresees different layers (see figure above) that separate the general underlying messaging, transacting, and validating infrastructure from the application layer, which comprises also smart contracts, which would then use layer 1 capabilities to realize their features. A main reason for separating smart contracts into another layer is to not compromise the messaging functionality. Smart contracts run on Wasp nodes on layer 2 in connection with Goshimmer on layer 1, responsible for conducting transactions and messaging (see next figure).
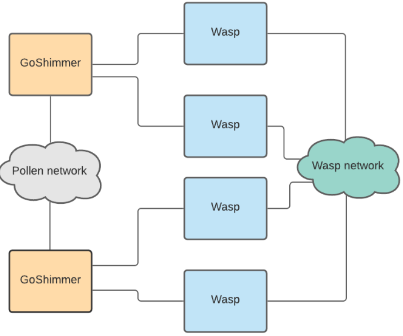
Due to the separation of Wasp and Goshimmer, they need a technical capability to connect and interact with each other. Therefore, Goshimmer nodes contain a “txstream” plugin, which needs to be activated for connecting Wasp nodes. Smart contracts are developed in the Rust programming language. Rust is known to generate very performant and memory efficient executables while preventing the developer from many classes of errors by a helpful compiler and a well-designed language. To test smart contracts and run unit tests against smart contract functionality, the “solo” environment written in Go can be used.
Setup
The described setup defines a private IOTA 2.0 network you can run on your laptop. The network hosts a layer 1 Goshimmer node for messaging and a layer 2 Wasp node for running smart contracts. On this basis, the next chapter shows how to develop and deploy a smart contract to this network.
Environment
I used Ubuntu 20.04 LTS with latest updates and upgrades and
- installed git
- installed rust 1.53.0 for developing native IOTA smart contracts by
curl --proto '=https' --tlsv1.2 -sSf https://sh.rustup.rs | sh
- installed wasm-pack 0.10.0 for compiling smart contracts into “WebAssembly” binaries by
curl https://rustwasm.github.io/wasm-pack/installer/init.sh -sSf | sh
Installed dependencies for rocksdb required by Goshimmer as its underlying database engine:
sudo apt-get install libgflags-devsudo apt-get install libsnappy-devsudo apt-get install zlib1g-devsudo apt-get install libbz2-devsudo apt-get install liblz4-devsudo apt-get install libzstd-dev
Cloned and built Goshimmer 0.7.5 from the develop branch (in the version of 2021–08–16) according the following description:
git clone -b develop https://github.com/iotaledger/goshimmer.gitgit checkout tags/v0.7.5cd goshimmergo build -tags rocksdb
Prepared Goshimmer for transaction handling
Save the config.json file to your Goshimmer directory to
- enable the txstream plugin, which allows Goshimmer to communicate with Wasp nodes
- disable the portcheck plugin
To check whether Goshimmer synchronizes its time and whether messaging works, open up the dashboard on your local machine by http://127.0.0.1:8081/dashboard. It needs to display
- TangleTime Synced: Yes
- Message: DBVBaNbSEsq8D1SuNd7ULLeSPTXLwQBwfW1agWKnFX23 (as an example) — that is, the message must not read 1111111111111111111111111 .. (containing only ones)
Before running Goshimmer, delete the message database of previous (erroneous) attempts ( if any) by rm -rf mainnetdb in the mainnetdb subdirectory of Goshimmer. The database will be automatically generated again with a fresh start of Goshimmer.
Also in case tangle time does not synchronize (see the dashboard on your local machine by http://127.0.0.1:8081/dashboard or the Goshimmer log: “can’t issue payload: tangle not synced”), shutdown Goshimmer, delete the message database, and restart Goshimmer.
Run Goshimmer in its directory as follows — after having created the ./assets/snapshotTest.bin file as described subsequently:
./goshimmer --autopeering.seed=base58:8q491c3YWjbPwLmF2WD95YmCgh61j2kenCKHfGfByoWi --node.enablePlugins=bootstrap,prometheus,spammer,"webapi tools endpoint",activity,snapshot,txstream --messageLayer.startSynced=true --autopeering.entryNodes= --node.disablePlugins=clock --messageLayer.snapshot.file=./assets/snapshotTest.bin --messageLayer.snapshot.genesisNode= --metrics.manaResearch=false --mana.enableResearchVectors=false --mana.snapshotResetTime=true --statement.writeStatement=true --statement.writeManaThreshold=1.0 --config=./config.json
Create a cli wallet
The cli wallet can send IOTA funds to a Wasp wallet, where it is used to deploy smart contracts. We generate an initial transaction with funds for our cli wallet.
Install the cli-wallet in a new directory
wget https://github.com/iotaledger/goshimmer/releases/tag/v0.7.5 download cli-wallet-0.7.5_Linux_x86_64.tar.gztar -xf cli-wallet-0.7.5_Linux_x86_64.tar.gz
Set reuse_addresses=true in the config.json of cli-wallet:
To create a new wallet run ./cli-wallet init , returning
IOTA 2.0 DevNet CLI-Wallet 0.2 GENERATING NEW WALLET … [DONE] ================================================================ !!! PLEASE CREATE A BACKUP OF YOUR SEED !!! !!! !!! !!! E7owJWtDBGSUAZUWQkn1kHG5zUy2PLQf6eEr3RoMCJs7 !!! !!! !!! !!! PLEASE CREATE A BACKUP OF YOUR SEED !!! ================================================================ CREATING WALLET STATE FILE (wallet.dat) … [DONE]
Note your SEED for allocating funds to this wallet.
We generate a custom genesis snapshot, with the transaction that allocates the funds.
Go to the Goshimmer installation directory and then to the following subdirectory ./tools/genesis-snapshot
Paste the seed of the previously generated cli wallet to the following command
go run main.go --token-amount 3500000 --seed E7owJWtDBGSUAZUWQkn1kHG5zUy2PLQf6eEr3RoMCJs7 --snapshot-file snapshotTest.bin
Now,
- go to your Goshimmer directory and inside of it run
mkdir assetscp ./tools/genesis-snapshot/snapshotTest.bin ./assets/snapshotTest.binto provide the generated snapshotTest.bin file to Goshimmer.
Setting up a Wasp node for smart contracts
I installed Wasp from the master branch in the state of 2021–08–03.
git clone https://github.com/iotaledger/wasp.git- check out a workable state of the code from the repository. I used this commit.
go build -tags rocksdbgo build -tags rocksdb ./tools/wasp-cli
We need to transfer funds to the Wasp wallet by creating the wallet in the first place by ./wasp-cli init
We need to get the address of the wallet by ./wasp-cli balance , returning something like
Address index 0 Address: 1Ah4cqMPdrDGx6Htapk7NZUxxcYHsP1C3oAugEYHVmACj
To send funds to this wallet, paste your address into this command and run it in the cli-wallet’s directory:
./cli-wallet send-funds -amount 40000 -dest-addr 1Ah4cqMPdrDGx6Htapk7NZUxxcYHsP1C3oAugEYHVmACj
Now, ./wasp-cli balance returns a balance of 40,000 IOTA.
Finally, configure wasp-cli to be able to connect to the local Goshimmer node and to form a committee of one local Wasp node by saving the wasp-cli.json file to the directory of your wasp-cli.
Deploying a chain
Smart contracts are deployed on a chain, which needs to be deployed first:
./wasp-cli chain deploy --committee=0 --quorum=1 --chain=predmarketchain --description="Prediction Market"
where
- committee=0 specifies to use one Wasp node only, which handles smart contracts.
- quorum=1 says one Wasp node is enough here — for development and testing
Now we have to provide funds to the chain by
./wasp-cli chain deposit IOTA:1000 --chain=predmarketchain ,
reducing the wasp wallet’s balance by 1,000 IOTA.
A Prediction Market Smart Contract
The private IOTA network is now used to develop and deploy a smart contract. I report the design and implementation of a simple prediction market in Rust, how to build and deploy it, and finally how to use it.
Design
A classic example of realizing a smart contract is given by a prediction market. A prediction market is a virtual electronic market allowing to predict outcomes of future events by placing a monetary bet on a certain outcome. Such events could be sports events, political events, future prices of stocks, or other events with uncertain future outcomes. For instance, the outcome of a political election could be subject to predictions on a prediction market. A simple binary question to be answered by prediction market participants could be “Will candidate/team A win?” — with possible outcomes being “yes” or “no”.
Our design of a prediction market for demonstration purposes is simple. We omit a book maker and a pricing mechanism. Formally, we do not pose a question with predefined possible outcomes. Instead, market participants can bet basically on any outcome of an event with an arbitrary amount of tokens until the time for predictions is over. Afterwards, the winning outcome is determined and winning bets placed on the correct outcome receive back their share on the overall amount of tokens placed in bets. Assume, in total 700 tokens were bet on “no” and 300 tokens in total were bet on “yes”, and “yes” is the actual outcome. A single bet on “yes” with 100 tokens receives (100/300)*(700+300) = 333 tokens, making a win of 233 tokens.
Realizing this design as a smart contract in the IOTA network allows to deploy one contract per question to be answered. The account deploying the contract is in control and has to specify the time until when bets can be placed on outcomes. The actual question to be answered has to be communicated in third party channels. Any network participant can then look up the contract and call a function to place a bet on an outcome by sending some IOTA from their wallet. Finally, after the time for predictions and bets has passed, the deploying account has to call a function to close the prediction market and to provide the actual outcome of the event and correct answer to the question. This triggers the evaluation of all bets with regard to the correct answer. Accounts with the correct answer receive the winning amount of IOTAs in a transaction.
Note that in a real world and more production-like scenario, one might consider using an oracle to provide the outcome of an event. Oracles can stream off-chain data (about events) into the Tangle, so smart contracts can use this data in their evaluations.
Implementation
Smart contracts for the IOTA network can be implemented in Rust and then compiled to a WebAssembly file.
Our demonstration smart contract implemented in Rust can be viewed and cloned from this repository. The smart contract first exposes three functions for (1) initializing a prediction market, (2) placing a bet on an outcome, and (3) closing the prediction market for determining winners. When the contract is loaded, the mentioned functions’ implementations are made publicly available under the first string’s name, e.g., “initmarket”.
#[no_mangle]
fn on_load() {
 let exports = ScExports::new();
 exports.add_func("bet", bet);
 exports.add_func("initmarket", init_market);
 exports.add_func("closemarket", close_market);
}
The first function should be called by the account deploying the contract for initialization. Optionally, the function can set an end time for betting using the parameter BETENDUTC, which is a date-and-time string in ISO format, assuming time in UTC. In case the parameter is omitted, bets can be placed at any time until the closemarket function is called (see below).https://medium.com/media/d46be7c079448590d97dec4737f438fb
fn init_market(context: &ScFuncContext) {
 // only contract owner should be able to do this
 let creator = context.contract_creator();
 let caller = context.caller();
 context.require(creator == caller, "Not authorised to init market - only contract creator is allowed to do this.");

 let mut log: String = "INITMARKET is run:".to_string();
 context.log(&log);

 // a flag, stating that the closemarket function was not (successfully) run yet
 context.state().get_string("marketclosed").set_value(&"false".to_string());
 // remove previous bets, if any
 context.state().get_string(&"containerofbetsjson".to_string()).set_value(&"".to_string());

 if context.params().get_string(&"BETENDUTC".to_string()).value() == "" {
 // default: do not use end time for bets
 context.state().get_int64(&"betenddatetime".to_string()).set_value(0);

 log = "Do not use specific end time for bets".to_string();
 context.log(&log);
 } else {
 // parse ISO datetime string, e.g. "2021-01-01 02:00" (in UTC) and convert to UNIX timestamp
 let betenddatetime: i64 = DateTime::::from_utc(NaiveDateTime::parse_from_str(&context.params().get_string(&"BETENDUTC".to_string()).value(), "%Y-%m-%d %H:%M").expect("failed to execute"), Utc).timestamp();

 log = "Bet end timestamp (UTC): ".to_string() + &betenddatetime.to_string();
 context.log(&log);

 // store state
 context.state().get_int64(&"betenddatetime".to_string()).set_value(betenddatetime);
  }
}
The second function allows to place a bet on a certain outcome value of an event, provided as parameter BETVALUE, e.g. “yes”. The amount to bet is the amount of IOTA sent with the function call. Bets must be placed in time before the betenddatetime has passed, which was set on initialization of the market. To save incoming bets for future evaluation to determine winners, I use two structs, defined in the beginning. That is, I define a hash map, mapping a betting account’s id to a Bet struct, which defines the amount of tokens and the outcome value of the bet. These custom structs are used instead of the built-in map offered by the context object of the function because only a proper hash map allows iterating over all keys and elements stored. As custom objects are not accommodated by the state stored in the context of the function, we need to jsonify it to produce a string, which can then be stored in the state.
#[serde_as]
#[derive(Deserialize, Serialize)]
struct Bet {
 // bet size in IOTA
 betamount: i32,
 // value for which the bet is valid, e.g., "yes" or "no" regarding a question or an outcome of an event
 betisforvalue: String,
}

#[serde_as]
#[derive(Deserialize, Serialize)]
struct ContainerOfBets {
 // map betting account's wallet address (string) to a Bet
 map: HashMap,
}


// function to place a bet on a certain value provided as parameter BETVALUE, e.g. "yes"
// the amount to bet is the amount of IOTA sent with the function call
// bets must be placed in time before the betenddatetime has passed set on initialization
fn bet(context: &ScFuncContext) {
 let currtime: i64 = context.timestamp();
 let betenddatetime: i64 = context.state().get_int64(&"betenddatetime".to_string()).value();

 // either we don't use a fixed end time - or we check if the end time is not exceeded
 if betenddatetime != 0 && currtime > betenddatetime {
 let log: String = "bet was not provided on time".to_string();
 context.log(&log);
 return;
  }

 let mut log: String = "BET is placed:".to_string();
 context.log(&log);

 // how much IOTA were sent with the transaction?
 let incoming = context.incoming().balance(&ScColor::IOTA);
 log = "bet amount (IOTA): ".to_string() + &incoming.to_string();
 context.log(&log);

 // get outcome value on which the bet was placed
 let betvalue = context.params().get_string(&"BETVALUE".to_string());
 // require parameter exists
 context.require(betvalue.exists(), "bet value parameter not found");

 // get wallet address of betting account
 let caller = context.caller().address();
 // store the value the bet refers to, e.g., "yes" or "no" - per betting account
 context.state().get_map(&caller.to_string()).get_string(&"betvalue".to_string()).set_value(&betvalue.to_string());

 // store all bets as jsonified hashmap in the state, which does not allow iterating over a map
 let containerofbetsjson = context.state().get_string(&"containerofbetsjson".to_string()).value();
 let mut containerofbets: ContainerOfBets;

 // already stored?
 if containerofbetsjson == "" {
 containerofbets = ContainerOfBets {
 map: HashMap::new()
 };
 } else {
 // de-serialize and re-create the struct from string
 containerofbets = serde_json::from_str(&containerofbetsjson).expect("failed to get container of bets");
  }

 // there can be only one bet placed per wallet/account
 if containerofbets.map.contains_key(&caller.to_string()) {
 log = "discarding the bet because a bet has been already placed by account ".to_string() + &caller.to_string();
 context.log(&log);
 return;
  }

 // create Bet struct and store in map under the betting account's (wallet) address
 let bet = Bet {
 betamount: incoming.to_string().parse::().unwrap(),
 betisforvalue: betvalue.to_string(),
 };
 containerofbets.map.insert(caller.to_string(), bet);

 // serialize all bets to a json string
 let containerofbetsjson = serde_json::to_string(&containerofbets).expect("failed to make json of container of bets");
 // store state as a string
 context.state().get_string(&"containerofbetsjson".to_string()).set_value(&containerofbetsjson);
}
The third function closes the prediction market and is to be called by the contract owner. Calls by other accounts will fail. The function can only be run after the specified end time has passed for predictions, and the function to close the market can be called successfully only once. The function requires a BETVALUE parameter, specifying the winning outcome, e.g., “yes”. The function runs through the stored bets, determines winning bets and the amount of IOTA coins they receive, and sends the IOTA to the wallets of the winners.
fn close_market(context: &ScFuncContext) {
 // only contract owner should be able to do this
 let creator = context.contract_creator();
 let caller = context.caller();
 context.require(creator == caller, "You are not authorised to close the prediction market - only contract creator is allowed to close the market.");

 // the value that won, e.g., "yes" or "no"
 let betvaluewinning = context.params().get_string(&"BETVALUE".to_string());
 // require parameter exists
 context.require(betvaluewinning.exists(), "winning bet value parameter not found");

 // only close market after end time for bets, specified on initalization
 let currtime: i64 = context.timestamp();
 let betenddatetime: i64 = context.state().get_int64(&"betenddatetime".to_string()).value();

 let mut log: String;

 // a flag to check whether the closemarket function was run
 let marketclosed: String = context.state().get_string("marketclosed").to_string();
 if marketclosed.eq(&"true".to_string()) {
 log = "the prediction market was already closed".to_string();
 context.log(&log);
 return;
  }

 // either we don't use a fixed end time - or we check if the end time is exceeded
 if betenddatetime != 0 && currtime <= betenddatetime { log = "closing the market can be only done after the end time for placing bets has passed".to_string(); context.log(&log); return; } // get all bets from global state // Note that the stat is not specific to a contract but to the whole chain on which it is deployed. let containerofbetsjson = context.state().get_string(&"containerofbetsjson".to_string()).value(); let containerofbets: ContainerOfBets; if containerofbetsjson == "" { log = "no bets stored".to_string(); context.log(&log); return; } log = "CLOSEMARKET is executed:".to_string(); context.log(&log); log = "the winning value is: \"".to_string() + &betvaluewinning.to_string() + &"\"".to_string(); context.log(&log); // set flag stating that the closemarket function was run context.state().get_string("marketclosed").set_value(&"true".to_string()); // get bets from json containerofbets = serde_json::from_str(&containerofbetsjson).expect("failed to fetch container of bets"); // we require more than one bet if containerofbets.map.keys().len()   0 {
 recipientaddress = ScAddress::from_bytes(&*context.utility().base58_decode(&betteraddress.to_string()));
 log = "transferring won amount of IOTA to: ".to_string() + &recipientaddress.to_string();
 context.log(&log);
 context.transfer_to_address(&recipientaddress, ScTransfers::new(&ScColor::IOTA, winamount))
  }
 } else {
 log = betteraddress.to_string() + &" placed a bet on \"".to_string() + &bet.betisforvalue.to_string() + &"\", which is not a win".to_string();
 context.log(&log);
  }
  }
}
Build
To build the smart contract, one can pull the accompanying repository on github with the following structure:
* Cargo.toml
* src/lib.rs
* pkg/
* target/
The full Rust code of the smart contract is contained in a file called lib.rs. The structure and the naming of files follows standard conventions for Rust. To define dependencies of the smart contract code, the Cargo.toml file reads as follows:
[package] name = "predictionmarket" description = "Demonstration IOTA smart contract implementing a simple prediction market" license = "Apache License 2.0" version = "1.0.0" authors = ["Achim Klein"] edition = "2018" repository = "https://github.com/51nodes/prediction-market-smart-contract" [lib] crate-type = ["cdylib", "rlib"] [features] default = ["console_error_panic_hook"] [dependencies] # essential for smart contract wasmlib = { git = "https://github.com/iotaledger/wasp", rev = "05516ca" } # better debugging of panics console_error_panic_hook = { version = "0.1.6", optional = true } # tiny allocator for wasm wee_alloc = { version = "0.4.5", optional = true } chrono = "0.4" serde = { version = "1.0", features = ["derive"] } serde_json = "1.0" [dependencies .serde_with] version = "1.9.4" [dev-dependencies] wasm-bindgen-test = "0.3.13"
The most important dependency is wasmlib, which is the IOTA’s smart contract library, allowing to produce smart contracts as compiled WebAssembly files. Furthermore, serde is used for serializing custom state objects to json strings for storage in the smart contract’s state. chrono brings some date and time related functionality required to control the end of a prediction market.
To build the smart contract, run wasm-pack build in the directory where Cargo.toml resides. The other directories like pkg and target are created automatically in the build process. The compiled WebAssembly file is located in the pkg directory and named predictionmarket_bg.wasm.
Preparation
We proceed by deploying our simple smart contract compiled as a WebAssembly wasm file.
Note: please adapt the path to the wasm file if required.
./wasp-cli chain deploy-contract wasmtime predictionmarket "Prediction Market SC" ./prediction-market-smart-contract/pkg/predictionmarket_bg.wasm --chain=predmarketchain --upload-quorum=1 -d --address-index=0
outputing:
uploaded blob to chain -- hash: 6wVabTkRUUGrQzEj8s4yuPC8dfaHGLsoHLXsqvveSw4hPosted on-ledger transaction BChQcWEmMptqRM1z4C9ZffTQXPebg1MMiEYENuAnV7KV containing 1 request:
- Request 4RkBSF6BAHgfamyJnXFy4r1YoVU9wvZ9b6uvXUjt2VWAfF5
Waiting for tx requests to be processed...
Posted off-ledger request 2JdtBzxjP4Bc6Tj2SnZPSctoYDHxuCAvPWJwn6ufMShJ6Lw
Now, functions can be called on the contract. First, the same wasp-cli that deployed the contract needs to call the initmarket function. There are two possibilities:
a) do not specify a specific an end date for the prediction market to simplify testing and development by this call ./wasp-cli chain post-request predictionmarket initmarket --chain=predmarketchain
b) specify a specific end date and time for the prediction market. The iso format is used and UTC is assumed. In this way, all bets must be placed before this time and the market can be only closed after this time. Run ./wasp-cli chain post-request predictionmarket initmarket string BETENDUTC string "2021-09-08 23:00" --chain=predmarketchain
Before placing a bet, we check the wallet’s balance with ./wasp-cli balance
returning
Address index 0
Address: 1BAgmaSN1RYk5rbbxMK21CZo8t2zQ3EFeMwDPnMhQdQbs
Balance:
IOTA: 28653
------
Total: 28653
For the deployed prediction market, we assume two possible outcomes “yes” and “no” on which bets can be submitted. To place a bet with 10 IOTA on “no”, we run
./wasp-cli chain post-request predictionmarket bet string BETVALUE string no --chain=predmarketchain -t IOTA:10
and afterwards, by ./wasp-cli balance we see the wallet’s balance reduced by 10 IOTA.
Address index 0
Address: 1BAgmaSN1RYk5rbbxMK21CZo8t2zQ3EFeMwDPnMhQdQbs
Balance:
IOTA: 28643
------
Total: 28643
We now introduce and prepare the setup for four more participants to the prediction market. Each participant requires another wasp wallet. Thus, we create four new subdirectories waspwallet2, waspwallet3, waspwallet4, waspwallet5 and copy wasp-cli and wasp-cli.json to those directories by repeating with regard to these directories
The last command initializes a new wallet.
In case the contract’s code is changed, it needs to be re-deployed using the first and main wasp-cli. You also need to re-deploy the chain on which the contract is deployed first. Due to the redeployment of the contract, the copied versions of wasp-cli.json (in waspwallet2 to waspwallet5 directories) miss the new address of the deployed predmarketchain chain. In this case, we need to get it back in there to be able to run bets on the same prediction market from another account. Either you noted the address of the chain when it was created, such as
activating chain nZBwoJi5q7KGk8D2cgm16PWrdM6aL2qTdCY27HHjZgrK.. OK.
or you perform a cat wasp-cli.json in the directory of your first wasp wallet, giving you some information like this (among other information):
{
 "chains": {
 "predmarketchain": "nZBwoJi5q7KGk8D2cgm16PWrdM6aL2qTdCY27HHjZgrK",
  },
Now you need to provide this address of the predmarketchain to the new wasp wallets’ configuration files. To do this, you can run the following command for the new wallets in the respective directories (e.g. in waspwallet2 through waspwallet5 in our example).
./wasp-cli set chains.predmarketchain nZBwoJi5q7KGk8D2cgm16PWrdM6aL2qTdCY27HHjZgrK
Please adapt the chain’s actual address nZBwoJi5q7KGk8D2cgm16PWrdM6aL2qTdCY27HHjZgrK to yours.
Finally, all four new wasp wallets need to be funded. First, find out their address by running (for each new waspwallet subdirectory)
waspwallet2/wasp-cli address
Then, provide the funds using cli-wallet (in the directory where it resides on your computer) by running
./cli-wallet send-funds -amount 40000 -dest-addr 1Ah4cqMPdrDGx6Htapk7NZUxxcYHsP1C3oAugEYHVmACj
and replacing the address 1Ah4cqMPdrDGx6Htapk7NZUxxcYHsP1C3oAugEYHVmACj with the actual address found by running ./wasp-cli balance before in the respective subdirectories (of waspwallet2 to waspwallet5).
Simulation of a Prediction Market
Now we are ready to place bets in the deployed contract’s prediction market on behalf of these four new participants. So, in the respective subdirectories we run say
cd waspwallet2./wasp-cli chain post-request predictionmarket bet string BETVALUE string yes --chain=predmarketchain -t IOTA:100cd ../waspwallet3./wasp-cli chain post-request predictionmarket bet string BETVALUE string no --chain=predmarketchain -t IOTA:50cd ../waspwallet4./wasp-cli chain post-request predictionmarket bet string BETVALUE string yes --chain=predmarketchain -t IOTA:200cd ../waspwallet5./wasp-cli chain post-request predictionmarket bet string BETVALUE string yes --chain=predmarketchain -t IOTA:500
Finally the contract owner (with the first wallet) can close the prediction market by running in the directory of the first wallet
./wasp-cli chain post-request predictionmarket closemarket string BETVALUE string no --chain=predmarketchain
In this example, the actual outcome is specified to be “no”. When running this command from a different wasp wallet’s directory, we obtain a log output on the Wasp node
You are not authorised to close the prediction market - only contract creator is allowed to close the market.
When successfully closing the prediction market, the Wasp node’s log outputs
CLOSEMARKET is executed:
the winning value is: "no"
total amount of bets placed on "no" is 60 IOTA
total amount of bets placed on "yes" is 800 IOTA
total amount of bets over all values: 860 IOTA
1FbCCHv9if3xbnRg3wJ7SY1kBFSdhNFR6Ax6haw6PhYDL placed a bet on "no", which is a WIN
bet amount: 10 IOTA; won amount: 143 IOTA; of total amount placed a bet on 860; where total amount per winning value: 60
transferring won amount of IOTA to: 1FbCCHv9if3xbnRg3wJ7SY1kBFSdhNFR6Ax6haw6PhYDL
1FZtVTCi2GDuQ1oMGZqpT38akLpcMiMv6a8MVKNJYYdsr placed a bet on "yes", which is not a win
1F81pGLKLhPb5ANFSGWQ7UPMSnPdahNZaZkgrcyaFXvpu placed a bet on "no", which is a WIN
bet amount: 50 IOTA; won amount: 716 IOTA; of total amount placed a bet on 860; where total amount per winning value: 60
transferring won amount of IOTA to: 1F81pGLKLhPb5ANFSGWQ7UPMSnPdahNZaZkgrcyaFXvpu
17jdFbAhWwF79fBEia6A8AYMTmMYncipaFhDTjsqUbMfp placed a bet on "yes", which is not a win
1BAgmaSN1RYk5rbbxMK21CZo8t2zQ3EFeMwDPnMhQdQbs placed a bet on "yes", which is not a win
consensus/action.go:338 postTransaction: POSTED TRANSACTION: 4Aw6PzQGkk6MFzPVAXZkz8RGiPocYxuxhA9o7qgeDN7h, number of inputs: 2, outputs: 3
EVENT: state was synced to block index #11, approving output: [0]4Aw6PzQGkk6MFzPVAXZkz8RGiPocYxuxhA9o7qgeDN7h
STATE TRANSITION TO #11. requests: 1, chain output: [0]4Aw6PzQGkk6MFzPVAXZkz8RGiPocYxuxhA9o7qgeDN7h
Revisiting the bets, we had placed the following ones:
no,address, bet on outcome, bet in IOTA
1,1FbCCHv9if3xbnRg3wJ7SY1kBFSdhNFR6Ax6haw6PhYDL,no,10
2,1BAgmaSN1RYk5rbbxMK21CZo8t2zQ3EFeMwDPnMhQdQbs,yes,100
3,1F81pGLKLhPb5ANFSGWQ7UPMSnPdahNZaZkgrcyaFXvpu,no,50
4,1FZtVTCi2GDuQ1oMGZqpT38akLpcMiMv6a8MVKNJYYdsr,yes,200
5,17jdFbAhWwF79fBEia6A8AYMTmMYncipaFhDTjsqUbMfp,yes,500
Bets number 1 and 3 were on “no” and the bet was on the actual outcome “no”. So the total amount of IOTA was 860, the bets on “no” were only 60 IOTA in total. The share of bet number 1 is 10/60 and share of bet number 2 is 50/60. So, wasp wallet 1 receives 1/6 of 860 IOTA, i.e, 143 IOTA. And wasp wallet 3 receives 5/6 of 860 IOTA, i.e, 716 IOTA. Note that when transferring funds, a minimum transaction of fee of 1 IOTA is deducted from the amount to be transferred.
Note that running the closemarket function of the smart contract a second time leads to an error message in the Wasp node’s log:
the prediction market was already closed
Limitations
There are some limitations of the presented prediction market
- Only one contract per chain can be deployed because the bets are not stored per contract identification in the chain’s state
- All bets are stored on-chain, so they are public
- Each account (given by a wasp wallet) can place only one bet per deployed prediction market contract
- The actual question asked by the prediction market and the possible outcomes have to be conveyed informally
- Bets are against other market participants — there is no market maker
Insights
Along the way of producing this article and experimenting with IOTA smart contracts, many small insights were gained. With the hope that these insights will be helpful, I share them in the following.
Transaction Time
Running transactions in the described setup on a laptop can take several seconds when waiting for the wasp-cli commands to finish. However, they can be run asynchronously when using the wasp-cli, i.e., commands can return immediately after issuing a command. Of course, transactions can run in parallel. When running scripted wasp-cli requests, one has to take care not to create too much load on the Wasp node because otherwise requests will fail with “time out”-errors. To evaluate transaction times in a production setup on the Devnet or Mainnet, further investigations are required.
Transaction Fees
In principle fees for transactions and deployments are configurable. However, there are some minimum fees that apply such as for deploying a chain (100 IOTA), deploying a smart contract, and posting state changing requests to a smart contract (1 IOTA). With default minimum fees in mind, transaction costs in the IOTA network should be very low compared to transaction fees in the Ethereum network. Note that chain owners could also increase transaction fees.
Production Readiness
On a first shot, nothing really worked when trying to set up a private IOTA network based on public documentation. That is, one has to find workable versions of the software, find a proper configuration and parameters, and find working ways for funding wallets and deploying contracts. The IOTA 2.0 software is under development and special notice has to be taken on which versions to run and which version of the different pieces (Wasp, GoShimmer, cli) to combine. The documentation in IOTA’s repositories is lagging behind the development process. However, the IOTA community is very helpful and can be reached on Discord. So, getting the network up and running depended digging into material on the github repositories, third party information (e.g., on youtube), own experiments, and asking questions on IOTA’s discord server. Once the IOTA private network and the smart contract are up and running, you are ready for testing and experiments. Further steps taken by IOTA to bring the smart contract implementation and IOTA 2.0 to production readiness can be looked up in their roadmap.
Developing Smart Contracts
Using Rust as a language for developing smart contracts might help producing error-free and stable smart contracts because Rust is well-known for its strict and sophisticated compiler which together with the strong typing and the language design eliminates whole classes of errors common in other languages. Also, the compiler provides helpful error messages. Therefore, using Rust can provide some advantages over the Solidity language, which is usually used for developing Ethereum smart contracts. However, Rust might be unfamiliar for smart contract developers being used to Solidity.
Conclusion
This article discussed smart contracts as a new and upcoming feature in IOTA 2.0. Because IOTA has a different approach to conduct and store transactions in a more parallel way with fewer resources than Ethereum, a higher scalability and lower fees are promises that come with this approach. Our experimental setup of a private IOTA network and simple prediction market IOTA smart contract shows that it is already possible to use IOTA smart contracts for development and testing. As the process of setting up the IOTA network and running smart contracts was a bit challenging, I believe this article and example code can provide useful input and support for other developers and the community interested in IOTA smart contracts.
51nodes GmbH based in Stuttgart is a provider of crypto economy solutions. 51nodes supports companies and other organizations in realizing their Blockchain projects. 51nodes offers technical consulting and implementation with a focus on smart contracts, decentralized apps (DApps), integration of blockchain with industry applications, and tokenization of assets.
Thanks to Majd Turfa and Jan-Paul Buchwald for their help in the course of developing this article, experiments, and the setup.