
A short time ago, we as 51nodes decided to host our own Kusama Validator. This article will help you to understand how you can set up your own Validator on Polkadot’s Canary Network. At the very least you will walk away with a basic understanding of how staking works in Polkadot and what responsibilities different roles have in the ecosystem. Let’s start with the most important concepts Validators and Nominators.
Validators and Nominators
In Polkadot’s ecosystem, a node participating in the BABE Consensus is called a Validator. Such an entity has three key responsibilities:
- Produce blocks if asked to do so
- Vote over the blocks (more precisely the “chain of blocks”) that still have to be finalized
- Forward messages between Parachains
To allow your Validator to become part of the active set that is currently validating the chain, you will need to stake a minimum of ~4000KSM. Obviously, holding or acquiring such a vast amount of KSM is only possible if you’re quite wealthy, as 4000KSM are 1.28 million dollars as of writing this.
A Nominator is an entity holding vast amounts of KSM, these are most likely entities involved in Polkadot for a long time. The Nominator elects different Validators to Stake his KSM. In short, this role describes someone who does not run his own node. Instead, the entity stakes their KSM most profitably by assigning their stake to a validator. Please understand that staking is risky for the Nominator, if the Validator — for whatever reason — stops running, they both risk getting slashed. The slash would ultimately affect the Nominator’s stake.
This mechanism incentivizes Nominators to choose Validators that charge a minimal commission fee and have a good reputation in running their nodes. Validators in return get incentivized to run their node as stable as possible. In return Validators can use low commission fees to attract Nominators.
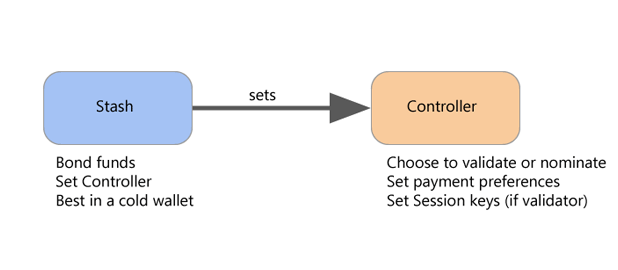
Controller and Stash
As we now know the two most important roles in the consensus process we can talk about the accounts you have to set up to run your Validator. Two account types are of importance at this stage — The Controller and the Stash.
Controller and Stash Accounts are explained quite easily. While the Stash is the entity holding the majority of your funds, the Controller is the entity having control over the Stash and the actions you take — like starting or stopping your Validator.
Setting up a Secure Validator
To set up your Validator you can either choose the manual set-up or the Secure Validator Setup. As you can already guess from the subtitle we have chosen the second option.
Within the Secure Validator Setup, you will have two options for setting up the node. The first option is to set up your server and the Polkadot application in one run using Terraform. We decided to use the second option which is to set up your server yourself and then use Ansible to securely set up the Polkadot application.
For the following setup you will need the following:
- At least one Debian-based machine (preferably Ubuntu 18.04 as used in Polkadot’s Documentation) with the following specs (min. 300GB Storage, 2–8GB Memory, 1–2 CPUs) hosted with the Provider of your choice.
- Ansible(v2.8+) installed on your machine
- A minimal of 3KSM depending on the amount you want to stake yourself. 0.3KSM will be needed for requesting an on-chain identity. 1–2 KSM should be held for upcoming transaction fees. The overhead can then be used to stake using your own validator. A higher amount of self stake raises trust in your validator as you project more trust on it yourself.
Preparing Your Node
Before deploying Polkadot to your remote machine you will need to prepare an additional user and ssh access for this user. Start with creating a new admin user and then create new ssh keys. Preferably you should also disable the root login as described in the ssh key instructions.
Running the Secure Validator Setup
If you successfully opened a shell to your remote machine, you can adjust the Ansible script for your needs. First, clone the repository:
git clone https://github.com/w3f/polkadot-validator-setup.git
Now start adjusting the ansible/inventory.sample file according to the instructions given in the setup guide. Below you can find an already edited example inventory file using placeholder values:
# Specify the nodes to setup. You can add more or remove entries, as you wish. # ## Validator 0 [validator-0]ansible_ssh_private_key_file=~/.ssh/ [validator-0:vars] ansible_user= # Preferably use a private telemetry server # telemetryUrl=wss://telemetry.polkadot.io/submit/ telemetryUrl=wss://telemetry-backend.w3f.community/submit loggingFilter='sync=warn,afg=warn,babe=warn' # ## Group all nodes [validator:children] validator-0 # ## Common variables [all:vars] # The name for how each node should be prefixed for the telemetry name project= # Can be left as is. ansible_ssh_common_args='-o StrictHostKeyChecking=no -o ConnectTimeout=15' build_dir=$HOME/.config/polkadot-secure-validator/build/w3f/ansible # Specify which `polkadot` binary to install. Checksum is verified during execution. polkadot_binary_url='https://github.com/paritytech/polkadot/releases/download/v0.8.30/polkadot' polkadot_binary_checksum='sha256:9dddd2ede827865c6e81684a138b0f282319e07f717c166b92834699f43274cd' # Specify the chain/network. # # For Polkadot: # ``` # chain=polkadot # polkadot_network_id=polkadot # ``` # # For Kusama: # ``` # chain=kusama # polkadot_network_id=ksmcc3 # ``` chain=kusama polkadot_network_id=ksmcc3 # Nginx authentication settings. nginx_user='prometheus' nginx_password=' ' # Node exporter settings. Disabled by default. node_exporter_enabled='false' node_exporter_binary_url='https://github.com/prometheus/node_exporter/releases/download/v0.18.1/node_exporter-0.18.1.linux-amd64.tar.gz' node_exporter_binary_checksum='sha256:b2503fd932f85f4e5baf161268854bf5d22001869b84f00fd2d1f57b51b72424' # Polkadot service restart settings. Enabled to restart every hour. polkadot_restart_enabled='true' polkadot_restart_minute='0' polkadot_restart_hour='*' polkadot_restart_day='*' polkadot_restart_month='*' polkadot_restart_weekday='*' # Optional: Restore the chain db from a .7z snapshot polkadot_db_snapshot_url='https://ksm-rocksdb.polkashots.io/kusama-6658753.RocksDb.7z' polkadot_db_snapshot_checksum='sha256:4f61a99e4b00acb335aff52f2383880d53b30617c0ae67ac47c611e7bf6971ff'
If you are done adjusting the inventory file to your needs you should be able to execute the playbook via the provided script:
chmod +x setup.sh
./setup.sh my_inventory.yml
The Ansible Playbook will now be executed and deploy the Polkadot service to your remote machine.
In case everything worked well your node should show up on the telemetry. It will now take some time until the node is in sync with the network. For us, this took nearly 7 days. Once finished you will only need to bond your KSM and set your session keys to enter your validator into the “waiting” list. From there on, it is a game of building trust into your Validator so that enough foreign stake is received to participate in the active validators pool. The more trust you generate in you and your node the more steady your rewards will become in the long term. To achieve more trust in your node you can also have a look at on-chain identities. For about 0.3KSM you can request a Registrar to verify your personal information which Nominators can then use to get more information on who is actually running the node.
Monitoring Your Validator
As keeping your validator up and running is key to running your node successfully, good monitoring is a must-have. For an initial layer of monitoring, you can use a Telegram Bot. But for the more sophisticated part of the monitoring, most people will use Prometheus and Grafana. You can set these up following the instructions given in Polkadot’s documentation but beware that some metrics might not show up in the provided Grafana dashboard as not all metrics are delivered which is what happened to us. This is why we enabled the node exporter in the Secure Validator Setup which provides additional data and can be displayed in Grafana with dashboards like this.
Validator Stats and Nomination
In the PolkadotJS-UI under Validator Stats you can browse Validators and inspect stats like rewards or previous slashes. For example, search for ESgN4sdziBpAubx2pGJ1CapGxetE2E1zUbTQCaRFbxxrW2Y and you will find our Validator. Using the displayed information a Nominator can determine his risk with a Validator. He should now be able to nominate the validator as described in the documentation.
51nodes GmbH based in Stuttgart is a provider of crypto-economy solutions.
51nodes supports companies and other organizations in realizing their Blockchain projects. 51nodes offers technical consulting and implementation with a focus on smart contracts, decentralized apps (DApps), integration of Blockchain with industry applications, and tokenization of assets.
[1] https://wiki.polkadot.network/docs/en/learn-staking