
Blockchain development and the development of decentralized apps (Dapps) has changed over the past 5 years. When I started with crypto in 2017, Ethereum had just launched, and Solidity programming became the new thing a lot of people wanted to learn. The only problem these days was that little information to get started was available, whereas today we can build on thousands of Youtube videos, courses like Cryptozombies or Openzeppelin standards.
Today, one doesn’t even have to know anything about Solidity programming or blockchains at all to create a product or service that is built on top of a blockchain. Nowadays there are services like Tatum and Moralis, providing almost everything you need to instantly start developing your product or service instead of managing all the “behind the scenes” things on your own.
This post explains how to get started with blockchain development using the platforms of Tatum and Moralis. I discuss pros and cons and what you can build with them today.
Introduction
The two main features of Moralis and Tatum are a Web API and an SDK for application development based on a public blockchain. With the Web API we can retrieve all the necessary data from a blockchain and with the SDK we can easily use code to interact with the blockchain to make a transaction or call a function of a smart contract. The blockchain data retrieved by the Web API can be accessed with the SDK as well. Without using such a service a developer must run his own full node to know the blockchains state in order to make a correct transaction based on the current state.
Moralis and Tatum work on multiple public blockchains like Ethereum, Binance Smart Chain, and Polygon. Thus, one can retrieve data from all these blockchains using a single Web API. While Moralis “only” covers 6 blockchains, the Tatum API covers around 40. Both APIs can be used to access the main network and a test network of a blockchain like for example Rinkeby or Ropsten for Ethereum.
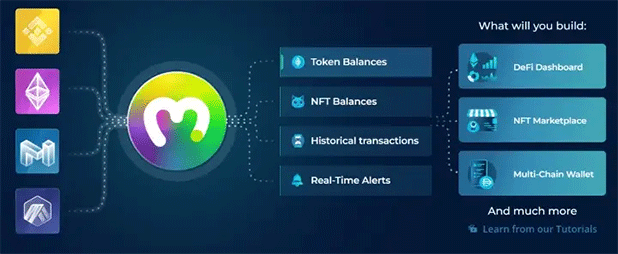
Behind the scenes, services like Tatum and Moralis run a full node of every blockchain they support. Having access to all blockchains’ data, they are able to aggregate it so that one can access all users’ balances, token balances or NFTs in one place. The API can then be used within the respective SDK to help developers creating their product or service. The following picture shows the general architecture of Moralis.
Web API comparison of Moralis and Tatum
Using a Web API to get all necessary blockchain data saves developers a lot of time and money. Retrieving blockchain data via Tatum and Moralis is free of charge. Both APIs are able to:
- Get all Transactions an address has made.
- Get the current block of any chain.
- Get the native balance or balance of any ERC-20 token.
- Get all NFT information of a user or a contract.
- Get and write data from and to IPFS.
Both, Moralis and Tatum cover all “basic” API requests. Differences are listed in the following.
Requests specific to Moralis’ API
- Get all Events emitted at a specific smart contract.
- Get liquidity pair reserves for a Uniswap based exchange (DeFi).
- Resolve an unstoppable domain and return the address.
Good thing to know: The Moralis Web API differentiate between all Ethereum Virtual Machine (EVM) blockchains like Ethereum, Binance Smart Chain, Avalanche and Polygon and the new created Solana Web API for Solana. For Solana, one can “only” retrieve users’ current balance, transactions, NFTs and tokens at the moment.
Requests specific to Tatum’s API
- Generate a wallet and get the private key, the mnemonics and the address.
- Deploy a standard ERC-20, ERC-721 and ERC-1155 contract.
- Interact with virtual accounts and the off chain ledger — I will cover this later in more detail.
How to use the APIs
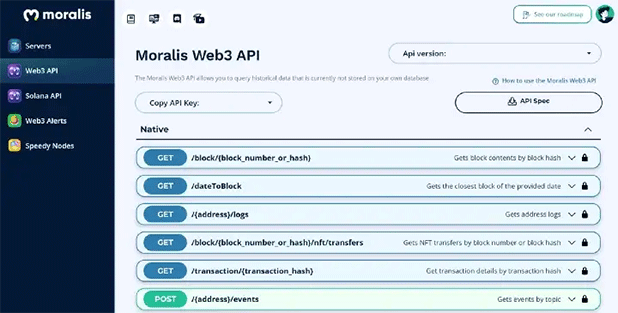
After you registered for Moralis you can see on the left side of the screen the Web3 API Button. Once clicked you can use the whole Web API within the browser (see figure below). The x-api-key and the whole curl request are shown when you execute a request. Using the API from outside the browser like for example with Postman or curl is also possible.
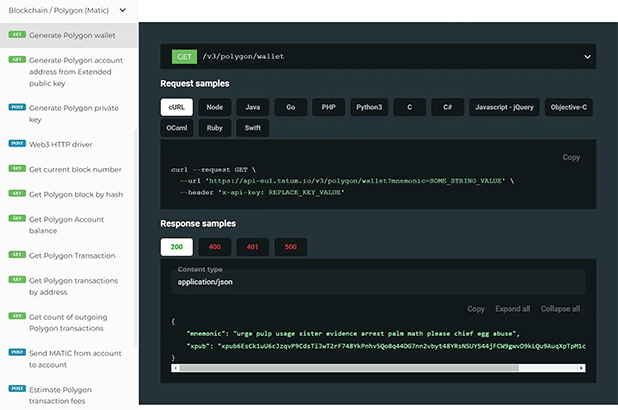
Using Tatum’s API works a bit different. After the registration you will be redirected to your dashboard. Here you can find your API keys — one for all main networks and one for all test networks.
To see the whole API you have to go back to the homepage to find the documentation of the API. Sadly, it is not possible to use the API within the browser. However, Tatum provides request code examples in 13 programming languages (see below)
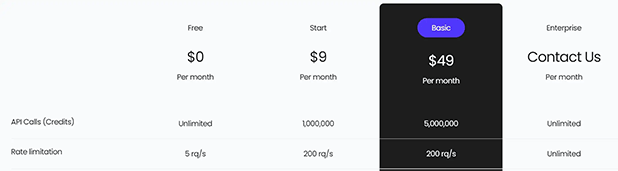
Pricing
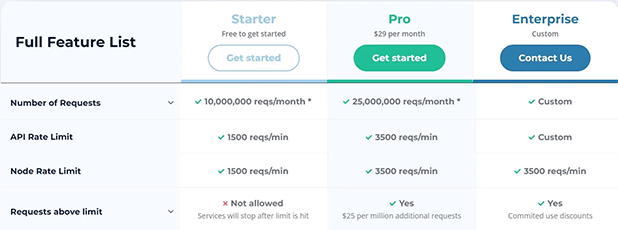
Both APIs have a very good free version that can be used immediately after registration. The following figures show the number of requests possible with the APIs, depending on the plan you may choose.
Web API conclusion
Most importantly first: both API’s from Moralis and Tatum are working great and as expected and I can recommend both to you. Moralis has a little bit less supported blockchains and features than Tatum but looks more modern on the other hand. With both API’s you have access for all “basic” requests and if you really need something advanced you should look at both API’s and compare if one of these API’s is already dealing with your problem. If so just choose it and try it out.
How to use Moralis’ blockchain SDK
Moralis describes itself as “the ultimate Web3 Development Platform” and is often said to be “the firebase of crypto”. Regarding help in blockchain software development, a JavaScript SDK is available. You can either use it as a plain npm module named “moralis” or you can use the “react-moralis” module to use the SDK within your React project. All the following paragraphs will focus on EVM blockchains but like already mentioned Moralis also support Solana.
Moralis server
Starting a new project with Moralis requires you to create a Moralis Server within your Dashboard.
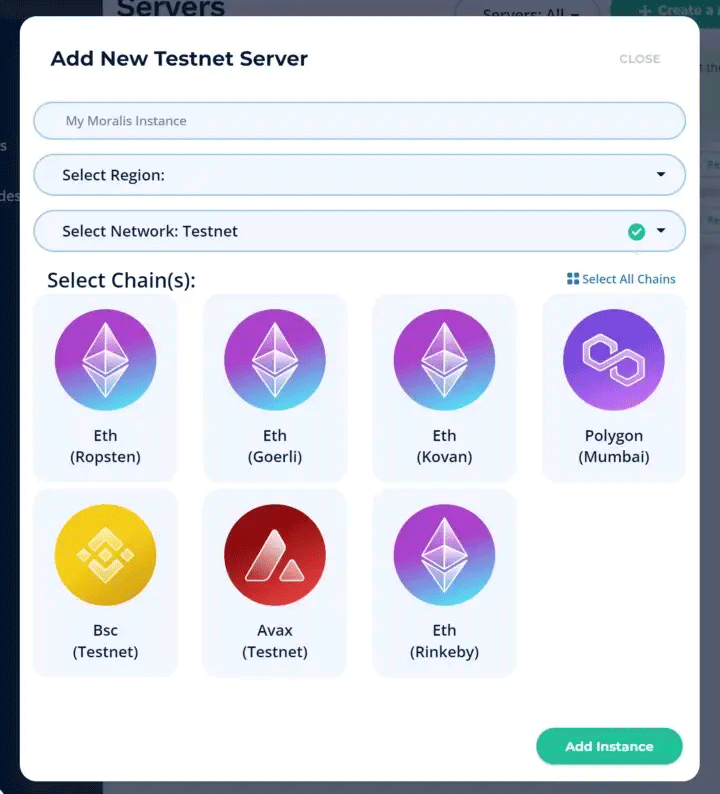
Creating a Moralis server requires only to select a name, your region, main network or test network and which blockchains should be included and listened to. In the free version of Moralis, you can run 3 of these servers at the same time but you must revoke them manually after 7 days.
After you created your Moralis server, you can open either its details or its dashboard. Opening the details will show you your Server URL and your Application ID. These two keys have to be imported in your SDK to use it correctly. In the dashboard you can see all your additional databases Moralis is creating for you.
In the following paragraphs I will show use cases of these additional databases and cover some of the more advanced features you can do with your Moralis server that is helpful for Dapp development.
Authenticating users
The Moralis SDK provides a simple way to track all users of a Dapp. Either users can register themselves with a username and password or do it the web3 way by using Metamask. The following code example shows how to connect your Dapp with your Moralis server and how to authenticate users the web3 way.
const Moralis = require('moralis');const serverUrl = "YOUR_SERVER_URL";
const appId = "YOUR_APP_ID";Moralis.start({ serverUrl, appId });Moralis.authenticate()
The authenticate function will open the user’s Metamask window and request a signature from the user by clicking the “Sign” button. Note that there is no gas fee involved in signing because it is not a transaction.
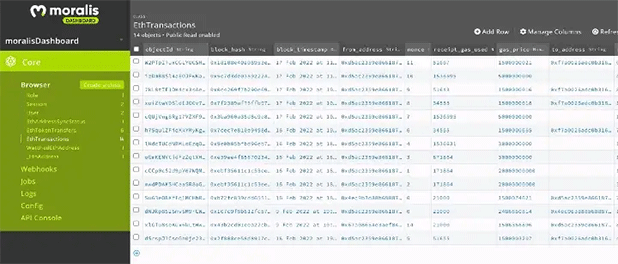
Now, here’s the cool part. Once a new user logged in, you can observe a new row added to your “User” table in the Moralis dashboard with the address of the user. Furthermore, the Moralis server creates additional tables like for example “EthTransactions”, where you can see all transactions made of all users on the blockchain networks you selected when creating the server.
Because your tables can get fast quite big, your whole database is capable of managing queries and filters in order to only get and show the desired data.
Listening to events
One feature only Moralis provides, is listening to events of a specific contract. To this respect, open your server details and go to the “sync” tab. Now either choose to “follow” a specific address or a specific event. If you choose to follow an event, you only have to paste its name with parameter, its ABI as JSON and the contract address. After creation the data will synchronize automatically and the result can be found within a newly generated table in your server. A more detailed tutorial can be found here.
Cloud-based queries
Complex database queries can be run on the Moralis server in the cloud. For example, if you have a table with movie ratings with 1–5 stars and you would like to know the average film rating, you normally would first get all ratings and then calculate the average. To directly get the answer, just deploy and call the query as a JavaScript function within your Moralis server. For more information about the correct syntax check out Moralis’ documentation here.
Getting data with Moralis’ SDK
Let’s take a closer look at the actual JavaScript SDK and how to retrieve blockchain data. Moralis differentiates between their “normal” API for all EVM blockchains and their Solana API. The following paragraphs refer to the EVM blockchain API.
To get some data, there are 4 entry points:
- With Moralis.Web3API.native.functionName(options) we can access the Web API data within our SDK. Click here for more information.
- With the useMoralisQuery(‘tablename’) function we can get access to all the data within a specific table of our Moralis server. With the React SDK it should also be possible to enable live updates whenever your table you reference to updates. However, this didn’t work for me while testing.
- With the Moralis.executeFunction(‘options’) function we can interact with a smart contract directly in order to get the state of a public variable or the result of a read only function. Click here for more information.
- With the Moralis.Cloud.run(‘function_name’) function we can execute our cloud functions and get the result back.
Using these methods, you can retrieve all blockchain data required for building your Dapp. Of course, all these possibilities can be combined within your Dapp. For example, many requests like getting the specific ERC-20 balance of an address can be resolved using any of these four possibilities.
Creating transactions with Moralis’ SDK
Knowing how to get blockchain data, let’s look at how to make a transaction with the Moralis SDK. The general approach of doing a transaction with the Moralis SDK is by conducting the actual transaction via Metamask. This way, the user and the developer don’t have to deal with any private keys, because Metamask handles them. Metamask provides the SDK with the information, which network the user is currently connected to, so we don’t have to deal with any blockchain network code. The SDK creates a correct transaction with the currently connected network on its own. Thus, the user only has to click on a button within the Dapp and Metamask to accept the transaction.
Making a transaction with the Moralis SDK is a one liner of code. Only the parameters of a transaction, e.g., the transaction amount, the receiver and the contract address have to be passed as JSON parameter to the Moralis.transfer(options) function. Note the different parameter settings in the code examples below to create a transaction for respectively sending a native coin, an ERC-20 token or an NFT. For more information click here.
1) Transfer native coin options
const options =
{type: "native",
 amount: Moralis.Units.ETH("0.5"),
 receiver: "0x.."
}2) Transfer ERC20 Token options
const options =
 {type: "erc20",
 amount: Moralis.Units.Token("0.5", "18"),
 receiver: "0x..",
 contractAddress: "0x.."
}3) Transfer ERC721 Token options
const options =
{type: "erc721",
 receiver: "0x..",
 contractAddress: "0x..",
 tokenId: 1
}// Call the Moralis.transfer function with options as parameter
const transaction = await Moralis.transfer(options);// You can wait until its confirmation and do sth. with the result
const result = await transaction.wait();
Interacting with smart contracts
For interacting with a function of a smart contract, you have to create an options variable as JSON string that includes the contract address, the function name, the ABI of the function, and the parameters. Now call the Moralis.execute(options) function with the options string as parameter. That’s everything it takes to create a transaction with the Moralis SDK as shown in the following code example.
let options = {
 contractAddress: '0x...',
 functionName: 'FUNCTION_NAME',
 abi: [ FUNCTION_ABI_AS_JSON ],
 params: {
     parameter1: value1,
    }
};const tx = await Moralis.executeFunction(options);
const result = await tx.wait();
Moralis conclusion
Moralis appears modern and helps building a Dapp. The Web API works great and using the SDK, it becomes a one liner to handle user authentication, getting data from any blockchain or creating valid transactions. Also, the documentation is very well written and detailed. They also have a very active Youtube Channel.
A limitation of Moralis is that it only deals with reading from and writing to a blockchain. Creating your own wallet or deploying a new smart contract are not possible. Therefore, scripting can get complicated because to send a transaction you have to deal with Metamask in the first place. But if you are only looking for a SDK that helps you build the JavaScript/backend part of your Dapp then choosing Moralis makes a good choice.
How to use Tatum’s blockchain SDK
Tatum describes itself as “The ultimate blockchain development platform” that offers a unified framework for 40+ blockchain protocols to reduce the complexity of blockchain development. While Moralis specialized in building Dapps, Tatum is a more general tool with a lot of methods needed to deal with a blockchain. Methods for creating and managing your own wallets and private keys, deploying smart contracts and interacting with them are included in the Tatum JavaScript SDK and their API.
Maybe because of the broad scope of Tatum, it feels a little bit unfinished. They feature a lot of services and endpoints instead of specializing on one specific. Thus, their Web API documentation is so big that it takes more than 2–3 seconds to load and render the whole page. Also, a lot of things are missing completely, and some other things are not properly explained yet in the documentation. However, Tatum told me that they are working on it already. So as well as in the Moralis section of this article, I will focus in the following paragraphs on EVM blockchains only, since the Tatum API is most developed for these kind of blockchains.
In the following paragraphs, I will show you the most important things you can put to use already today with Tatum.
Initializing Tatum’s SDK
Tatum’s SDK is as well written for JavaScript and can be downloaded as npm module with the name ‘@tatumio/tatum’. Once installed you can import it within your project and use one of the hundreds of functions Tatum provides. Calling any of these functions is a one liner. But compared to Moralis you don’t pass all the options as a single JSON string, but rather each parameter is passed individually.
Generating a wallet
By creating a wallet from scratch, we can script any transaction we want because we know the private key and can sign transactions on our own. To create a wallet with the Tatum SDK you need to import the generateWallet function and the Currency Enum. Once you call the function with the desired cryptocurrency, like for example Bitcoin or Ethereum, you will get your 24-mnemonic words and your xpub for your newly generated HD-wallet.
With these two variables, Tatum can create new addresses with the corresponding private keys for your new wallet using the generateAddressFromXPub and generatePrivateKeyFromMnemonic functions, which you have to import as well. The following code demonstrates the whole process.
1) const {generateWallet, generateAddressFromXPub, generatePrivateKeyFromMnemonic, Currency} = require("@tatumio/tatum");2) const btcWallet = await generateWallet(Currency.BTC, false);3) const btcAddress = generateAddressFromXPub(Currency.BTC, false, "YOUR_XPUB", "HD_WALLET_INDEX");4) const btcPrivateKey = await generatePrivateKeyFromMnemonic(Currency.BTC, false, "YOUR_MNEMONICS", "HD_WALLET_INDEX")
In the first line of code, we import the SDK and all required functions. In the second line, we generate a Bitcoin wallet and get the mnemonic and the xpub. In the third line, we create a new address from the xpub and in the fourth line, we create the private key for it. Because we are dealing with a HD-Wallet you must also pass the index of it as a parameter.
Tatum’s Key Management System (KMS)
To create a transaction, we need our newly created private key to be passed as a parameter to each function. Because it is never a good idea to send your private key across the internet, Tatum provides two approaches: (1) You can sign your transaction locally — this way you must have your private key stored locally on your computer, or (2) you can use the Tatum Key Management System (KMS). KMS is a cloud solution by Tatum, allowing to import your private keys encrypted with a password of your choice to let Tatum sign transactions for you within their service. This way, the private key doesn’t have to be sent across the internet because Tatum signs your transaction and only sends the signature of the transaction. For more information, click here.
Accessing blockchain data
Currently, the Tatum SDK does not support yet to get all the blockchain data being available via the API. So to access blockchain data via Tatum, one should consult the Web API docs and make a HTTP request. This method can be used to build your own Dapp. I recommend to create a separate function for each request, in which you pass all necessary parameters and do the actual HTTP request within this function. This way, you create your own little framework for one-liner requests to get any necessary data from the blockchain.
Interacting with a smart contract
Interacting with a smart contract doesn’t work yet with the SDK at the time of writing. Instead, you must use the API as described here.
Transfering coins and tokens
At least the transfer functions for native coins, ERC-20 tokens, NFTs and ERC-1155 tokens exist already in Tatum’s SDK and are documented. The following code example shows how to create an ERC-20 token transaction. For more information, check out the documentation.
import {sendEthOrErc20Transaction, ethGetTransaction, Currency} from '@tatumio/tatum';const transaction = await sendEthOrErc20Transaction({
chain: Currency.'CHAIN_TO_USE',
fromPrivateKey: 'YOUR_PRIVATE_KEY',
contractAddress: 'CONTRACT_ADDRESS',
digits: DIGITS_OF_TOKEN,
amount: "AMOUNT_TO_SEND--0.1 for example",
to: "TO_ADDRESS"
});const transaction = await ethGetTransaction(transaction.txId);
Deploying a standard smart contract
Tatum’s SDK allows deploying standard smart contracts for EVM-compatible blockchains. Thus, one can deploy a smart contract with custom parameters for token standards listed below. Detailed information on parameters to use regarding using one of the token standards are linked to the list:
Virtual accounts
Virtual accounts are more or less the equivalent of a Moralis server. It’s a separate private ledger maintained by Tatum to enable, e.g., setting up webhook notifications when at a specific address a new transaction is observed. While for Moralis you must paste your address to synchronize and the webhook URL endpoint in your server’s dashboard, in Tatum you must set it up using the SDK or API. Moralis’ dashboard has great usability but Moralis provides no API for specifying webhooks. Tatum on the other hand has no dashboard but provides an API and SDK for the setup.
Unfortunately, Tatum’s SDK did not work properly during my experiments and I had to use the API again to test the webhooks. The steps for setting up a virtual account in Tatum and to subscribe to blockchain events are:
- Create a new wallet and save your ‘xpub’
- Create a new virtual account with the ‘xpub’ as one of the parameters. Only a private key corresponding to this ‘xpub’ is allowed to do a transaction within this virtual account.
- Connect the address to sync with your virtual account
- Initialize a subscription that listens to incoming events and send the data to the endpoint of your choice.
Tatum conclusion
Tatum’s SDK is a not a complete product at the moment, given its claims. Tatum aims at offering much more features than Moralis for interacting with a blockchain, especially when starting from scratch. Tatum is also more flexible by supporting more blockchains and already provides more usable features that can be helpful for scripting: Generating a wallet, managing keys, or deploying a new smart contract works great. The documentation is quite okay, but I would like to see Tatum to improve on that in the future. For functions not present in the SDK yet, you can use Tatum’s API instead, which works fine. To conclude, Tatum already provides a decent service and given the assumption that they will improve their documentation and SDK, I can recommend using Tatum’s SDK and API for developing a Dapp.
Other blockchain SDKs and APIs worth considering
Besides Moralis and Tatum, several other services exist that provide a Web API and a SDK for Dapp development. But none of them are as advanced as Moralis and Tatum and can be used only for some parts of your Dapp probably.
- Idexo: It is another service, offering an SDK for blockchain development that feels like the very small brother of Tatum. Idexo provides only an SDK and is very limited regarding the number of blockchains and features. When trying to evaluate it, I had problems with registration and login. What Idexo is most known for is their Telegram bot that allow users to mint an NFT within Telegram.
- The Graph: This is a Web API, focussing on complex and automated queries on Ethereum and IPFS.
- NOWNodes: They offer a Web API that is comparable to Tatum. The service supports also 40+ blockchains and a lot of endpoints are supported for each blockchain.
- Infura: Infura provides some tools and endpoints to interact with the Ethereum blockchain and IPFS.
- Cosmos: If you even want to build a custom blockchain, then the Cosmos SDK might be worthwhile. Creating an own blockchain gets almost as simple as deploying a new token with it.
Conclusion
It’s astonishing to experience how easy blockchain development has become due to tools and services like Moralis and Tatum. I recommend to use Moralis for developing a Dapp and to use Tatum for close interaction with different blockchains. I expect more to come as these services are evolving quickly. On top of that many other services exist to keep an eye on.
51nodes GmbH based in Stuttgart is a provider of crypto economy solutions. 51nodes supports companies and other organizations in realizing their Blockchain projects. 51nodes offers technical consulting and implementation with a focus on smart contracts, decentralized apps (Dapps), integration of blockchain with industry applications, and tokenization of assets.
Thanks to Achim Klein and Jan-Paul Buchwald for their help in the course of developing this article.